Styles Dialog (PSE 11+)
 The layer styles let us create dazzling visual effects without editing the layer content.
A single style may include various effects and blending options.
Alas, not all effects and settings of full Photoshop are available in PSE. Now you can find the missing options in E+ "Styles" dialog.
1. Select a suitable layer in the Layers panel.
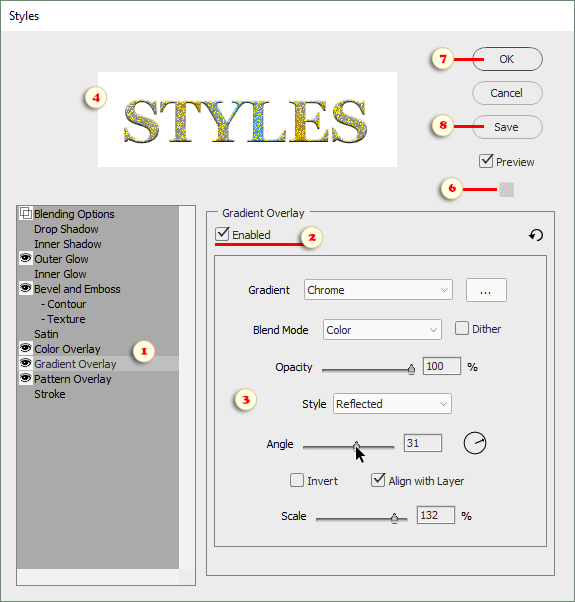
2. Open E+ Styles dialog, select an effect in the list to your left (fig. 1), check "Enabled" gadget (fig. 2), and define the effect settings (fig. 3).
*The effects applied to the current layer are marked in the list with the "eye" ![]() symbol (fig. 1).
symbol (fig. 1).
3. To turn off an applied effect, select it in the list and uncheck the "Enabled" checkbox.
4. While the script dialog is open, Photoshop Elements may not display the editing progress in the image window. The preview at the dialog top (fig. 4) lets you evaluate the result in real time.
5. If the edited layer is taking up only a fraction of the document, the preview may be too small. To make it usable, prior to opening the Styles dialog, select the area of interest with the Rectangular Marquee ![]() Tool (fig. 5).
Tool (fig. 5).
6. In case you need to display the current result in the image window, click the gray square (fig. 6), that opens Color Picker dialog. This trick updates the image window. To dismiss the Color Picker, press [Esc] key.
7. To apply the created style, click "OK" button (fig. 7).
8. To save the style as a preset for later use, click "Save" button (fig. 8).
![]() A video-tutorial on this topic is available here.
A video-tutorial on this topic is available here.
NB. For more detail on each effect and its settings, read the full Photoshop documentation.

