Tool Presets (PSE 13+)
 As we know, the Tool Options panel allows to dramatically change a tool's behavior.
For quick switching between various usage scenarios, consider "Tool Presets" feature.
As we know, the Tool Options panel allows to dramatically change a tool's behavior.
For quick switching between various usage scenarios, consider "Tool Presets" feature.
0. Choose a tool in the Toolbox and customize its settings in the Tool Options panel (fig. 0).
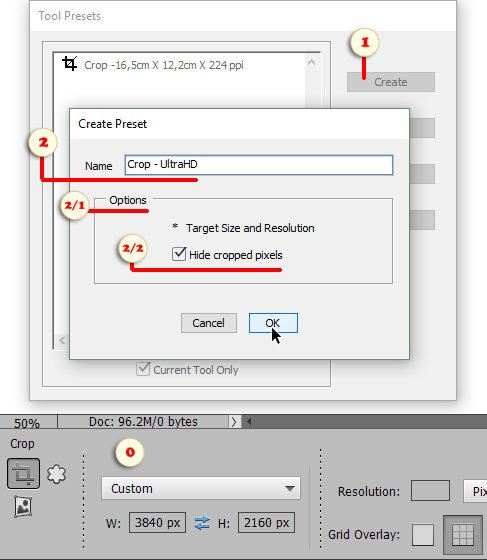
1. Open "Tool Presets" dialog and click "Create" button (fig. 1).
2. In "Create Preset" dialog that opens, enter a descriptive name (fig. 2) and click "OK".
The savable settings for the current tool are specified in the "Options" section (fig. 2/1).
Not all parameters can be stored to a preset. For example, in certain cases, brush tip shape, scatter, and some other settings may not be saved.
In the meantime, for the Crop ![]() Tool, you can define "Hide cropped pixels" option (fig. 2/2), which is unavailable in the Tool Options panel (more about).
Tool, you can define "Hide cropped pixels" option (fig. 2/2), which is unavailable in the Tool Options panel (more about).
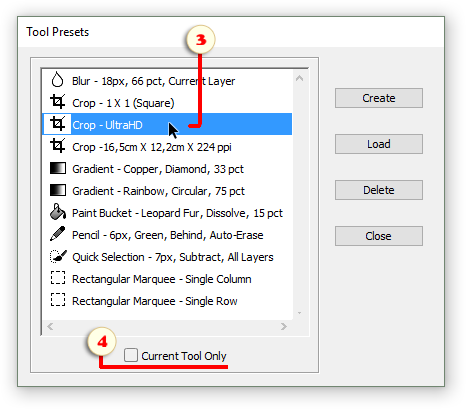
3. To load the saved settings, open "Tool Presets" dialog and double-click the required item (fig. 3).
4. By default, the dialog only displays presets for the currently selected tool. If you want to switch between any tool presets, uncheck "Current Tool Only" gadget (fig. 4).
![]() A video-tutorial on this topic is available here.
A video-tutorial on this topic is available here.