How to Edit Vector Paths (PSE 10-14)
When drawing with the ![]() Pen, some anchor points may be positioned incorrectly and some segment lines may be curved imperfectly. The inaccuracies can be corrected either during the drawing or after its completion.
Pen, some anchor points may be positioned incorrectly and some segment lines may be curved imperfectly. The inaccuracies can be corrected either during the drawing or after its completion.
1. First off, make sure that the edited path is active. For example to enable editing a shape layer, click its thumbnail in the Layers panel.
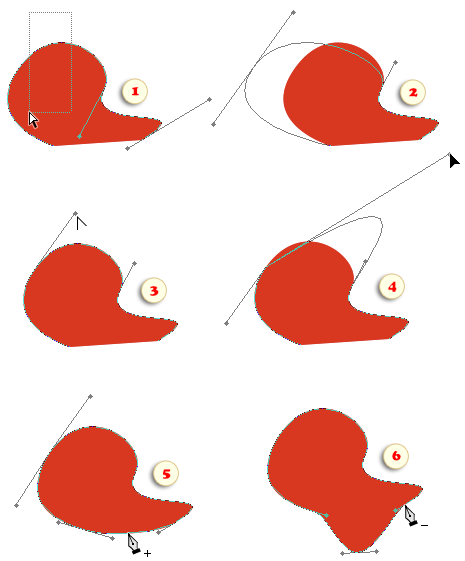
2. Hold down [Ctrl] key to temporarily activate the ![]() Direct Selection tool and drag in the area of supposed location of the required anchor point (fig. 1).
Direct Selection tool and drag in the area of supposed location of the required anchor point (fig. 1).
Tip. If you have trouble finding the nodes, use "Highlight Anchor Points" script.
3. Use the keyboard cursor keys (up/down/left/right arrows), to reposition the selected point as needed (fig. 2).
4. To correct the curvature of the adjacent segments, hold down [Alt] key, position the pointer over the lever handle (fig. 3), and -- still holding [Alt] -- set the lever angle and length (fig. 4).
5. If the adjacent segments are straight lines, the anchor point hasn't any levers. To bend such lines, [Alt]-click on the point and pull aside (without releasing [Alt]).
6. Sometimes you may need to add an extra node in the middle of a segment. Just position the ![]() Pen over the path -- which temporarily activates
Pen over the path -- which temporarily activates ![]() Add Anchor Point tool -- and click on it (fig. 5).
Add Anchor Point tool -- and click on it (fig. 5).
7. To remove unnecessary point, position the ![]() Pen over it -- this activates the
Pen over it -- this activates the ![]() Delete Anchor Point tool -- and click it (fig. 6).
Delete Anchor Point tool -- and click it (fig. 6).
Note: Since the node points are not displayed in PSE, finding their exact location may be a problem. Move the pointer along the path until the ![]() symbol turns to
symbol turns to ![]() .
In case this method doesn't help, use "Highlight Anchor Points" script.
.
In case this method doesn't help, use "Highlight Anchor Points" script.
