Looks
![]() Suppose, while editing an image, you made a very complex correction and now you want to save this cool effect for later use. Another example: you need to automate a routine adjustment, say, some standard pre-print corrections.
Suppose, while editing an image, you made a very complex correction and now you want to save this cool effect for later use. Another example: you need to automate a routine adjustment, say, some standard pre-print corrections.
In both cases, you may rely on the "Looks" script:
- To save the current image adjustments, you open "Looks" dialog and click "Save" button.
- To apply a saved preset (aka "look") to another image, open the "Looks" dialog and
double-click the required item in the list.
Now let's look at the script in more detail.
1. To enable saving color and tonal corrections, accomplish those as separate adjustment layers ("Levels, "Color Balance", etc.). If the edited document contains fill layers ("gradient", "solid color", or "pattern"), they will be included into the "look" as well.
2. The layer styles, blending modes, and opacity settings of the source adjustment layers are also to be saved.
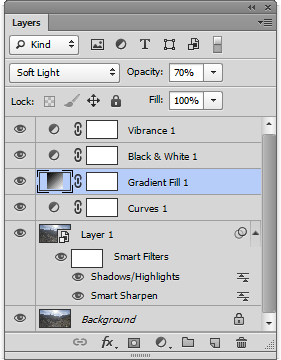
3. To add a filter (e.g., sharpening or artistic one) into the saved preset, apply it as smart filter (screenshot).
4. To exclude some layers from the look, just hide them by clicking the corresponding "eye" ![]() on the Layers panel. Excluding the "Background" layer isn't necessary.
on the Layers panel. Excluding the "Background" layer isn't necessary.
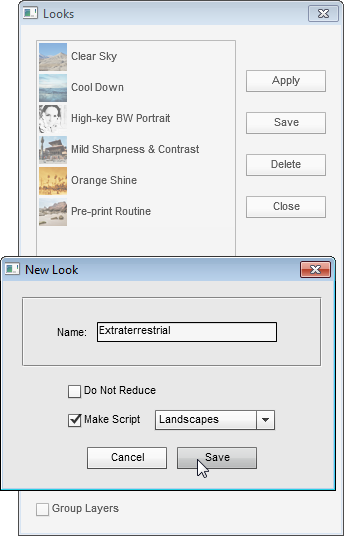
5. Now that your corrections are ready for saving, run the "Looks" script, click "Save" button, and enter a descriptive name for the new look (screenshot).
The correction presets get saved in PSD format to "/Script Arsenal/Required/Looks" folder. By default, to reduce the file size, the script uses very small pixel dimensions. The raster, text, and shape layers, as well as layer masks, are normally excluded.
6. "Do Not Reduce" checkbox lets you save full-sized PSD's with all the layers (except for the hidden ones) and masks. You may use this option, for example, for creating a template with a frame, clip art, text, logo, or similar elements.
While using this approach, please, keep in mind the following:
- Such a template is usually bound to a specific image
size.
- Large PSD
images may require a huge amount of disk space.
7. "Make Script" option -- along with saving a look -- creates a script for applying the preset without opening the "Looks" dialog. You may need it, e.g., for batch processing of a whole folder of photos.
Applying the saved looks is very easy:
8. Open an image of your choice.
9. Run the "Looks" script. In the dialog that opens, choose the required look in the list. Then either click "Apply" button or double-click the required item in the list.
Alternatively, you can load a look with "Apply Look" action.